Audacity
Kristine Hunter
Instructor
CB 200B
(906) 217-4252
kristine.hunter@baycollege.edu
What is Audacity?
Audacity is a free, easy-to-use, multi-track audio editor and recorder for Windows, Mac OS X, GNU/Linux and other operating systems. You can use Audacity to:
- Record live audio
- Convert tapes and records into digital recordings or CDs
- Edit WAV, AIFF, FLAC, MP2, MP3 or Ogg Vorbis sound files
- Cut, copy, splice or mix sounds together
- Numerous effects including change the speed or pitch of a recording
Recording Vinyl Records in Audacity
- Using the computer provided, login to your student account using your Bay College username and password
- Turn on the external speakers
- Take the dust cover off the turntable
- Turn on the turntable
- Open Audacity
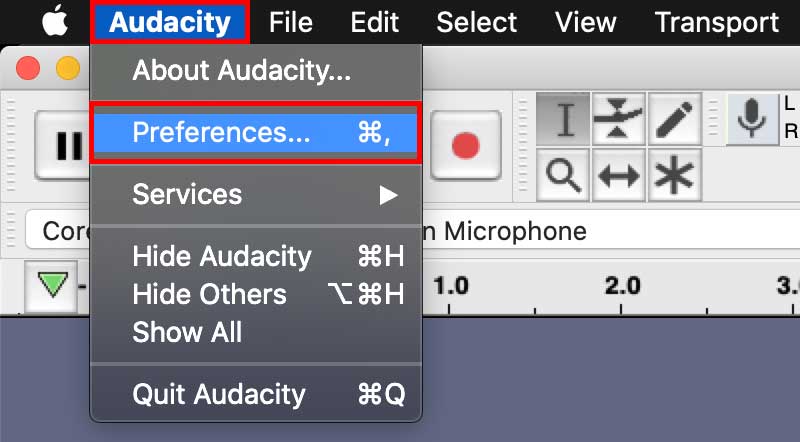
- IMPORTANT! In Audacity, go to Audacity > Preferences

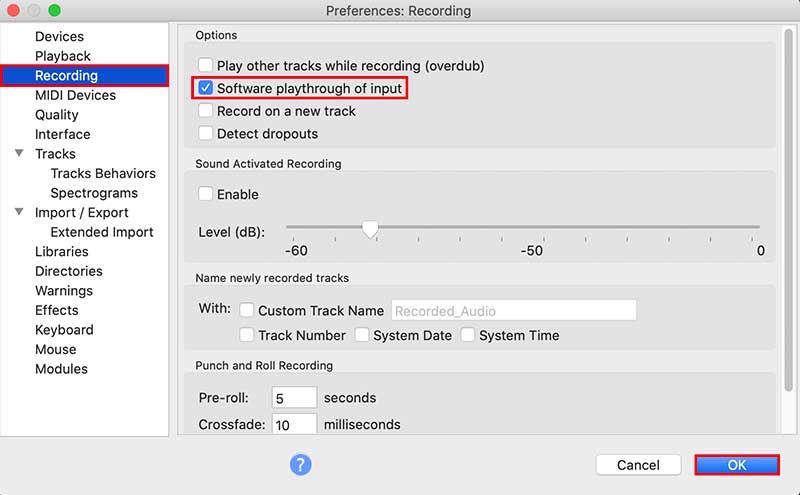
- Click "Recording" and check the box next to "Software playthrough of input" (Doing this allows you to listen to the record playing while recording in Audacity)
- Click "OK"

- Put a record on the turntable
- Lift the turntable tonearm off the rest and gently place the needle on the record
- In Audacity, click “Click to Start Monitoring” on the Recording Device audio channels to listen to the record playing (See screenshot below)

- If prompted, allow Audacity to access your microphone
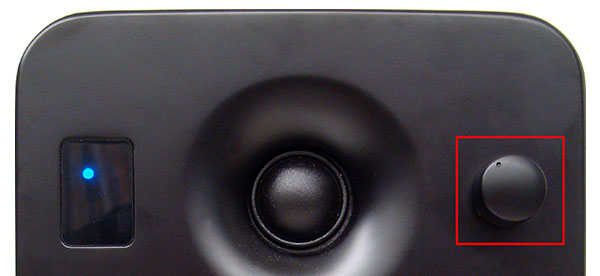
- Adjust the speaker volume as needed by turning the volume knob to the left or right
- Tap “R” on the keyboard to start recording within Audacity
- Tap the Spacebar to stop recording
- Tap the Spacebar again to playback what you've recorded (Loop playback = Shift + Spacebar
If you don't hear your audio recording while attempting playback, repeatedly press the volume knob on the speaker to change the speaker output while playing your audio recording in Audacity until you hear your audio recording (See photo below).

- Edit your sound within Audacity as needed (e.g. Trim audio, add effects etc.)
- Save your sound as a .WAV file by selecting File > Export Audio or use the keyboard shortcut Ctrl + Shift + E
- Name your file and click “SAVE”
- Bypass the “Edit Metadata Tags” window by clicking “OK”
- When finished recording, take the record off the turntable, place the record back in the white paper sleeve and slide it behind the record cover in the clear poly sleeve
- Return the record(s) to the library staff at the circulation desk to be returned back to the library shelf
Useful Keyboard Shortcuts
- Preferences = Ctrl + P
- Start Recording = R
- Start/Stop Playback = Spacebar
- Loop Playback = Shift + Spacebar
- Zoom In = Ctrl + 1
- Zoom Normal = Ctrl + 2
- Zoom Out = Ctrl + 3
- Select All = Ctrl + A
- Export Audio = Ctrl + Shift + E
- Open = Ctrl + O
Useful Audacity Effects
- Normalize - Applys a constant amount of gain to an audio recording to bring the amplitude to a target
level.
- Select the audio you want to Normalize
- In the main menu, select Effect > Normalize
- Click Removal - Removes clicks on audio tracks and is especially suited to declicking recordings made from vinyl records, without
damaging the rest of the audio.
- Select the audio you want to apply click removal
- In the main menu, select Effect > Click Removal
Kristine Hunter
Instructor
CB 200B
(906) 217-4252
kristine.hunter@baycollege.edu